Snapseed App: 3 Advanced Techniques for Pro Photo Editing
Snapseed is a powerful mobile photo editing app, and with these three advanced techniques—stacking effects, using the selective tool, and mastering the healing brush—you can elevate your images to a professional level directly from your smartphone.
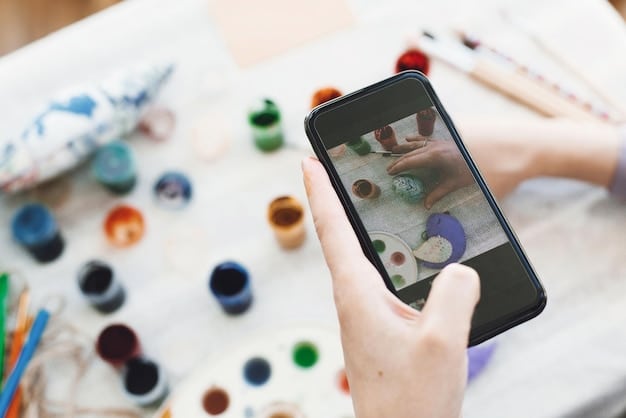
Want to take your mobile photography to the next level? The Snapseed app is a powerhouse of features, and we’re here to show you three advanced techniques that will transform your editing skills.
Unlock Your Inner Pro: Snapseed’s Hidden Editing Gems
Snapseed is more than just your average mobile photo editor. While it boasts a user-friendly interface, it also houses a collection of advanced tools that, when mastered, can produce stunning results. We’re diving deep into three of these gems.
These techniques aren’t just about slapping on filters. They’re about precision, control, and creating a unique visual style that sets your photos apart. Prepare to say goodbye to mediocre edits and hello to professional-quality imagery, all from the convenience of your smartphone.
Why Mastering Snapseed’s Advanced Features Matters
You might be wondering why you should even bother with these advanced techniques. Can’t you just stick to the basic sliders and filters? Absolutely, but that’s like only using a fraction of a painter’s palette. By understanding and utilizing advanced features, you gain:
- Unparalleled Control: Precisely target specific areas of your image for editing.
- Creative Freedom: Develop a unique style by combining and layering effects.
- Professional Results: Achieve edits that rival desktop software, all on your phone.
Ultimately, mastering these features empowers you to tell your story more effectively through your photographs. So, let’s get started!
In conclusion, Snapseed’s advanced features offer a pathway to unparalleled creative control and professional-quality results. By mastering these techniques, you can elevate your mobile photography and tell your story with greater precision and impact.
Stacking Effects: Create Unique and Complex Edits
Ever wanted to apply multiple filters and adjustments to a single photo, but felt limited by the typical one-at-a-time approach? Snapseed’s stacking feature allows you to layer edits non-destructively, giving you ultimate flexibility.
This means you can experiment with different combinations, tweak individual adjustments, and even undo changes without affecting the underlying image. It’s like having an unlimited undo button for your creativity.
Understanding Stacking Basics
The key to stacking effects is understanding the “Edits” tab. This is where Snapseed stores your editing history, allowing you to revisit and modify each step individually. To access it:
- Open your image in Snapseed.
- Apply your first edit (e.g., tune image, details, or a filter).
- Tap the “Edits” icon (the pencil with a line through it at the top of the screen).
- You’ll see a list of all the adjustments you’ve made.
How to Stack and Modify Edits
Now for the fun part: adding more edits! Simply apply another adjustment or filter as you normally would. It will be added to the stack. You can then:
- Reorder Edits: Long-press and drag edits to change their order in the stack.
- Adjust Opacity: Tap on an edit, then tap the “adjust” icon. Use the slider to control how much of that effect is visible.
- Undo Edits: Tap on an edit and then tap the trash can icon to remove it.
With stacking, you’re not just applying effects; you’re sculpting them. This level of granular control is what separates a good edit from a truly great one.

In essence, stacking effects in Snapseed offers unparalleled flexibility in photo editing. By allowing for non-destructive layering and individual adjustments, this technique transforms the mobile editing workflow, enabling users to achieve complex and unique visual styles.
Selective Tool: Precision Editing at Your Fingertips
Sometimes, you only need to adjust a specific area of your image, not the entire thing. That’s where the Selective tool comes in. It lets you target particular spots with pinpoint accuracy.
Imagine brightening just the subject’s face, or increasing saturation in the sky without affecting the foreground. The Selective tool makes this kind of precise editing incredibly easy.
Using the Selective Tool: A Step-by-Step Guide
Here’s how to use the Selective tool to make localized adjustments:
- Open your image in Snapseed.
- Tap “Tools” and select “Selective.”
- Tap on the area you want to adjust. A small blue dot will appear.
- Pinch to adjust the size of the selection (the red area shows the affected region).
- Swipe up or down to choose the adjustment type (brightness, contrast, saturation, or structure).
- Swipe left or right to increase or decrease the adjustment value.
- Tap the “+” icon to add more control points.
The key is to use multiple, smaller selections rather than a single large one for better control and a more natural look.
Creative Applications of the Selective Tool
The possibilities with the Selective tool are endless. Here are a few ideas to get you started:
- Dodging and Burning: Selectively brighten highlights (dodge) or darken shadows (burn) for added depth and contrast.
- Color Correction: Enhance the colors of a flower or make the sky more vibrant.
- Reduce Distractions: Subtly desaturate distracting elements in the background.
The Selective tool puts you in the driver’s seat of your image, allowing you to fine-tune every aspect with incredible precision. It’s about making targeted improvements that enhance, not overshadow, the original beauty of the shot.
To conclude, the Selective tool in Snapseed enables precision editing by allowing users to target specific areas of an image. This leads to localized adjustments, enhancing particular elements without affecting the entire composition, thus offering finer control and more natural-looking results.
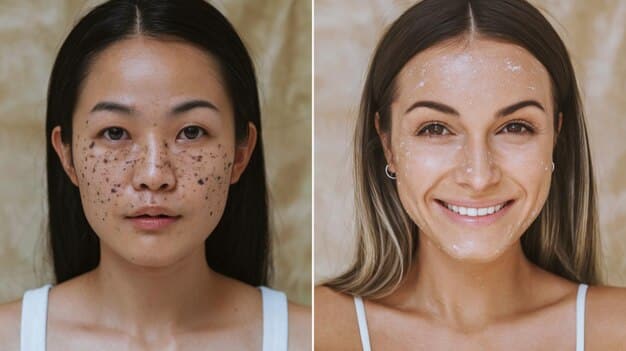
Healing Brush: Banish Imperfections with Ease
Every photo has a blemish, a stray object, or a tiny imperfection that detracts from the overall image. The Healing Brush is your magic wand for removing these distractions.
Whether it’s a stray power line in a landscape or a small mark on a portrait, the Healing Brush seamlessly blends the surrounding pixels to make imperfections disappear.
How to Use the Healing Brush Effectively
Here’s how to use the Healing Brush to remove unwanted elements:
- Open your image in Snapseed.
- Tap “Tools” and select “Healing.”
- Zoom in on the area you want to heal.
- Simply tap or brush over the imperfection. Snapseed will automatically sample pixels from the surrounding area to fill in the space.
- For larger areas, use short, controlled strokes.
The Healing Brush works best on areas with consistent texture and color. If you’re working on complex areas, try using smaller brush strokes and multiple passes.
Tips for Seamless Healing
To achieve flawless results with the Healing Brush, keep these tips in mind:
- Zoom In: Work at a high zoom level for greater precision.
- Use Short Strokes: Avoid long, sweeping motions, which can create blurry or unnatural results.
- Sample Wisely: If the initial result doesn’t look right, try tapping a different area nearby to resample the pixels.
The Healing Brush is a powerful tool, but it’s best used subtly. Remember, the goal is to enhance your image, not to completely alter it. A gentle hand can transform your image from imperfect to impeccable.
In summary, the Healing Brush in Snapseed is a valuable tool for removing imperfections and distractions from photos. With careful application and attention to detail, it can significantly improve the overall quality of images, helping them appear flawless and polished.
Exporting and Sharing Your Masterpieces
Once you’ve perfected your Snapseed edit, it’s time to share it with the world! Snapseed offers several export options to suit your needs.
Whether you want to save a high-resolution version for printing or a compressed file for social media, Snapseed has you covered. Let’s explore the options.
Understanding Export Options
To export your edited image, tap the “Export” button in the bottom right corner. You’ll see several options:
- Save: Overwrites the original image with the edited version. This is a destructive option, so use it with caution.
- Save a Copy: Creates a new copy of the image, preserving the original. This is the safest option for non-destructive editing.
- Export: Allows you to choose the file format (JPEG or PNG), quality, and size.
- Share: Directly shares the image to various social media platforms and apps.
For most purposes, “Save a Copy” is the best choice. It ensures you always have the original image to revert to if needed.
Optimizing for Different Platforms
Different platforms have different image size and resolution requirements. Here are some general guidelines:
- Instagram: Maximum width of 1080 pixels.
- Facebook: Maximum width of 2048 pixels.
- Printing: At least 300 DPI (dots per inch) for high-quality prints.
When exporting for social media, choose a smaller file size to ensure faster upload speeds and reduce data usage. For printing, choose the highest resolution and quality settings.
When exporting and sharing your photos, optimization not only enhances the viewing experience but also ensures compatibility across various platforms. Taking the extra moments to save a copy or adjust settings can preserve the original quality while tailoring the image for its intended digital stage or physical print.
| Key Technique | Brief Description |
|---|---|
| ✨ Stacking Effects | Layer multiple edits non-destructively for unique results. |
| 🎯 Selective Tool | Precisely adjust specific areas of your image. |
| 🩹 Healing Brush | Remove blemishes and distractions seamlessly. |
| 📤 Exporting | Optimize your images for social media and printing. |
Frequently Asked Questions (FAQ)
▼
Yes, Snapseed is completely free to download and use. There are no hidden costs or subscriptions. You get access to all of its features without paying a dime.
▼
Absolutely! Snapseed’s non-destructive editing allows you to undo any edit at any time. Just go to the “Edits” tab and remove or modify the adjustment.
▼
Yes, Snapseed is available for free on both iOS (iPhone and iPad) and Android devices. The interface and features are virtually identical on both platforms.
▼
When exporting, choose the “Export” option and select JPEG or PNG with the highest quality setting. This will save your image with the maximum possible resolution and detail.
▼
While Snapseed isn’t a replacement for professional desktop software, it’s a very capable tool for making quick edits and enhancing photos on the go. It can certainly be part of a professional workflow.
Conclusion
By mastering these three advanced techniques – stacking effects, using the selective tool, and the healing brush – the transformative effect on your mobile photography will be immediately noticeable. These tools are essential for those looking to elevate their work, adding both precision and flair. With practice, the creative possibilities become vast, ensuring your photographs stand out with a uniquely polished finish.


